Glad I Made the Switch to Olympus – Reason #2
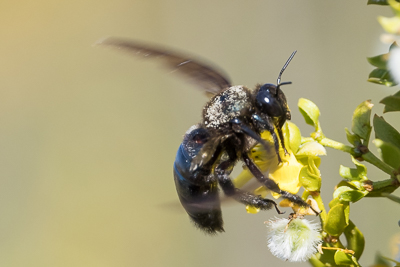
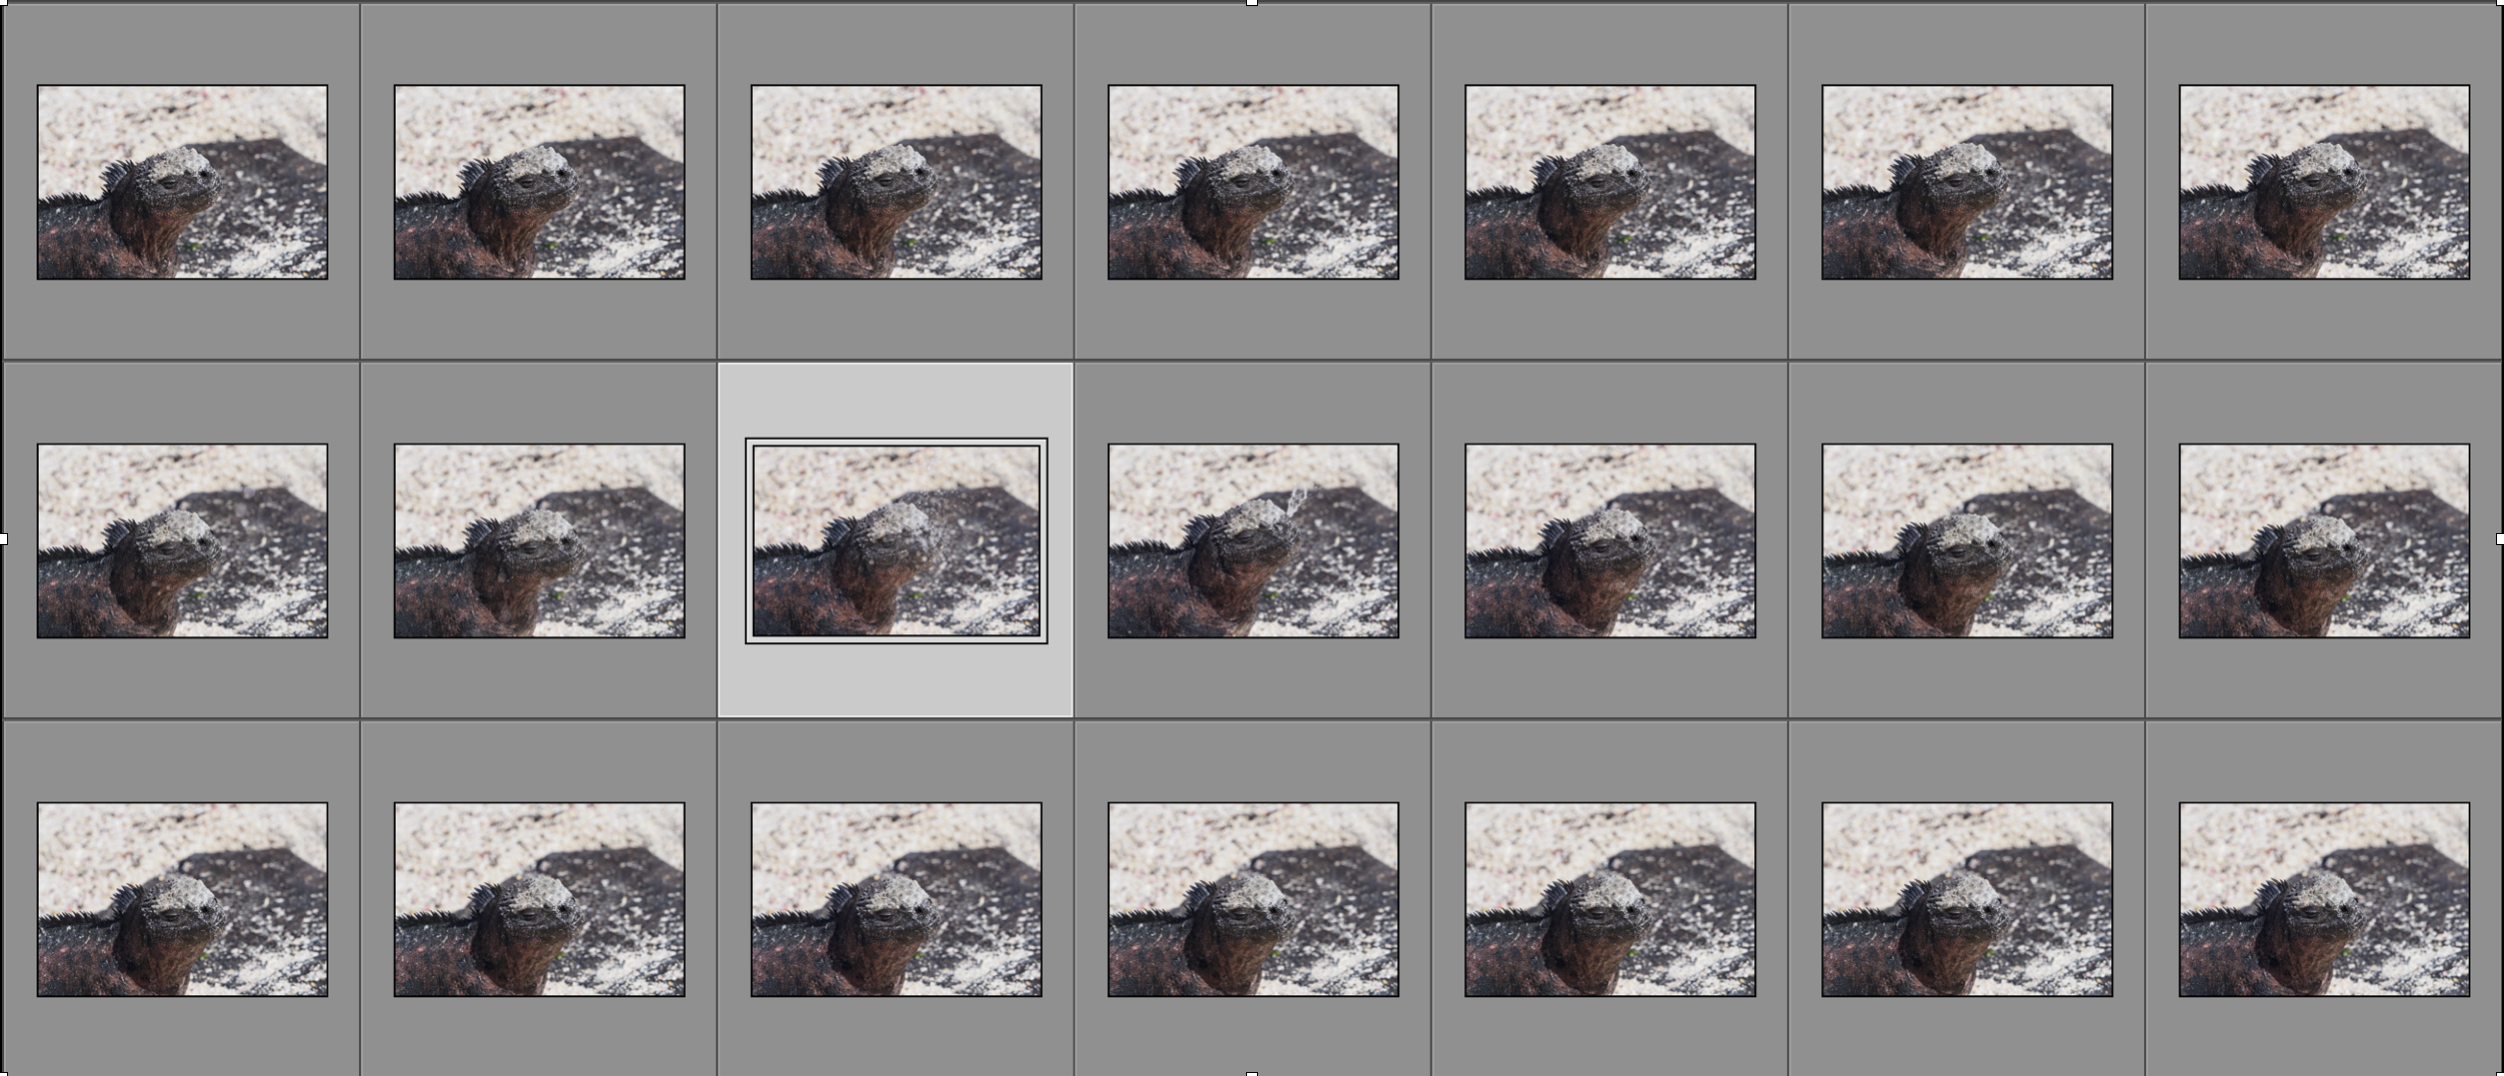
In September 2019, I co-led my first Galapagos Islands Photography workshop with Kevin and to say it was a magical experience is an understatement. You can read the trip report here. Having switched to the Olympus OM-D system in April prior to this trip was also a brilliant move (let’s be honest, lucky) on my part. My Olympus gear allowed me to hand hold (see prior blog post on benefit of hand holding) on every island, on the boat, and in the pangas (zodiacs). I was so much more mobile without a tripod and big heavy lens as I laid on the sand, knelt on trails, walked in the surf, and sat on the edge of the pangas. Having said all that, there is one feature of the Olympus OM-D system that is found on the following Olympus bodies I own and use E-M1x, E-M1 Mark II, and E-M1 Mark III. This feature is so revolutionary and it can’t be found on any other camera bodies currently. This feature is Pro Capture Mode. To be clear, the Pro Capture mode is not just the high speed mode as there is a sequential high mode that is great for wildlife photography. No, the Pro Capture Mode takes “high speed” to another level. There are actually two different Pro Capture Modes one is called Pro Capture Low and the other is Pro Capture High. In our modern world, we tend to think high (faster) is always better, but as with anything there are caveats and distinctions that are critical to understand when it comes to using these modes. At their basic, these two modes allow you to capture images that really aren’t possible to capture using many other cameras because Pro Capture Low mode will shoot up to 18 frames per second (fps) and Pro Capture High mode will shoot up to 60fps!! That is crazy! The way this mode works once selected is by pressing the shutter button halfway, once you do this, the camera begins to hold x number of photos in buffer (x is a number you define which can be anywhere from 0 to 35 images) and then once you press the shutter button fully, it will record the images in buffer to the camera’s card and continue recording images at up to 18fps in low and up to 60fps in high! It will record images for up to one minute (that could be up to 3,600 images). If you wanted to continue after that, you have to let go of the shutter button and begin again. What this allows us to do is capture moments that we would miss because the time lag between when our eye sees the action or event, our finger presses the shutter button and the shutter is triggered, would be too late to actually capture the event! I will share an example below from the Galapagos Islands. Given that the high mode will do up to 60fps, why don’t we use that mode all the time! First, you would have so many images to sort, edit, and store that it would be overwhelming. Imagine 10 minutes of shooting at 60fps, you could possibly end up with 36,000 images!! I am not sure we would need that many images of any one event in a lifetime! Given some of these realities, let’s take a look at the benefits and limitations of each mode. Pro Capture Low In this mode, you can shoot up to 18fps (we say up to, because depending upon other settings in the camera, it may be lowered a bit). The real benefit of the Low mode over the High Mode is that focus, exposure (if you are shooting in any mode other than manual), and white balance (if on auto) will all change if need be prior to each image. So, when you are trying to photograph a subject that you anticipate will change the distance from you during shooting, this is the mode to choose. In this mode, the smallest aperture (f-stop) you can use is f/8.0. Pro Capture High In this mode, you can shoot up to 60fps with the same note as above on items possibly affecting the fps. While this mode locks focus, exposure, and white balance at the values metered when the shutter button is halfway, the real advantage to this mode is the ability to record sequences and events that you could never possibly react to fast enough in real time. Of course, you have to be careful as you can fill a memory card in a hurry using either of these two modes regularly or for shooting that doesn’t really require such capture rates. There are limitations to each and they both utilize the electronic shutter which also has one undesirable effect at times. The electronic shutter can result in distortions of moving wings on birds and insects as seen in the image below which is not a good image, as it is out of focus, but it illustrates my point. This doesn’t happen in every case, just depends upon the position and movement of the wings. Note the weird curve to the wings of this carpenter bee. This is a result of using an electronic shutter. A few other limitations of each mode is as follows: Pro Capture is not available when connected to a smartphone. Now, let’s get to a real world example of how using Pro Capture Mode allowed me to capture an image I would likely have never been able to capture with any other camera. One day during the Galapagos Workshop (see, there WAS a reason I mentioned it before other than pure promotional purposes), we were just beginning to walk around the area of Punta Suarez on Isla Espanola (Espanola Island). There were numerous Marine Iguanas lounging in the area and as you may or may not be aware, since they forage underwater in the Pacific Ocean, they ingest way more salt than their bodies need. To eliminate this excess salt, they expel it through their nostrils. Now, there is no way to predict which one will do so and even less to know when a given individual will do it. You can, at times, see a bit of head movement just prior, but you are not fast enough to do this without Pro Capture Mode on your own. I found an iguana with a dark rock behind the head that would help show the salt being expelled because it would be lost against the pale sand. I then put my Olympus in Pro Capture High mode since I expected the iguana would remain in the same plane of focus and not move out of the area of sharpness. As I shoot in manual mode 100% of the time, I set my aperture to f/8.0 (the smallest I can go in Low mode), the ISO to 800 to give me a relatively fast shutter speed of 1/2,000. I knelt down to put the dark rock in a good area against the iguanas head and where salt would shoot out when expelled. I set my focus on the eye of the iguana (using back button focus) and then I pressed my shutter button halfway to begin holding 25 images in buffer (that is how many I have set to be held, it can be anywhere from 0 to 35). The camera began to hold those images and then I waited. At times, I waited and waited and nothing happened. Finally, while watching through my 120fps electronic viewfinder, I saw the iguana expel the salt!! I fully pressed the shutter button and out of the sequence of 53 total images, there were two that captured the salt being expelled and you can see the two in order captured below. Marine Iguana Blowing out Salt (Image #1) Marine Iguana Blowing out Salt (Image #2) Here is a part of the sequences of images with the highlighted image being the second to show salt expelled. If you think these images of the iguana are awesome and you would like to try and capture such images, I am heading back to the Galapagos Islands with Kevin in September 2021 and I hope you will join me! I will share with you one more result of using Pro Capture Mode and in this instance, it was using the Low mode. I took this image yesterday down in the Christmas Mountains near Big Bend National Park where a client was hoping to capture images of Lucifer Hummingbirds and I took a break to practice with Pro Capture Modes on flying insects. The Creosote bushes were blooming and butterflies and other pollinators were out in mass in warmer temperatures. I found a Lyside Sulphur (Kricogonia lyside) of which there were many and focused on the butterfly. I then half pressed the shutter button to begin putting images into buffer memory. Next, I waited for the butterfly to take off from its perch. I tried this 5 to 7 times with different Lyside’s. Out of all the images, the one below is my favorite as it was very nice with the pose, the background and relatively sharp. I did use Topaz Sharpen AI to help make it a bit crisper. If you purchase Topaz software, I would sure appreciate you using the link provided as that does help support me in bringing you great content! Lyside Sulphur I hope this article has helped you understand just one more reason I am glad I made the switch to the Olympus OM-D System! If you have any questions about this, or any other feature about Olympus, feel free to contact me. If you are an Olympus owner and would like some one-on-one instruction, we offer such instruction online. For future reference, you can learn more about Pro Capture Mode on page 152 and 168 in the E-M1x user’s manual, on page 79 and 82 in the E-M1 Mark III manual, and on page 46 and 48 in the E-M1 Mark II manual. I will cover how to actually set up Pro Capture Modes in a future video post. If you haven’t made the switch yet, what are you waiting for? Lee Hoy Olympus Educator Wildside Nature Tour Photography Workshop Leader Owner of Big Bend Birding & Photo ToursPro Capture Mode
Real World Examples with Pro Capture Mode
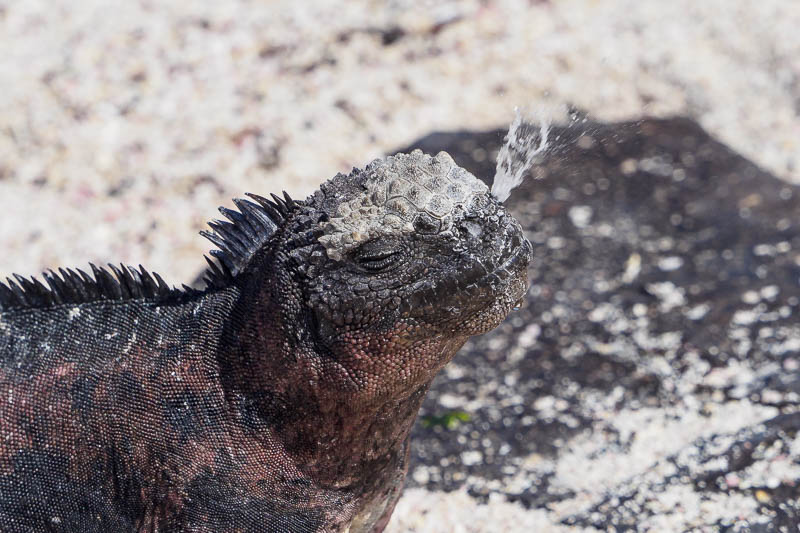
Amblyrhynchus cristatus venustissimus
Punta Suarez Isla Espanola
Galapagos Islands National Park
Olympus OM-D E-M1x
Olympus M. Zuiko 40-150 f/2.8 IS PRO
Pro Capture Mode – Handheld
1/2000 | f/8.0 | ISO 800
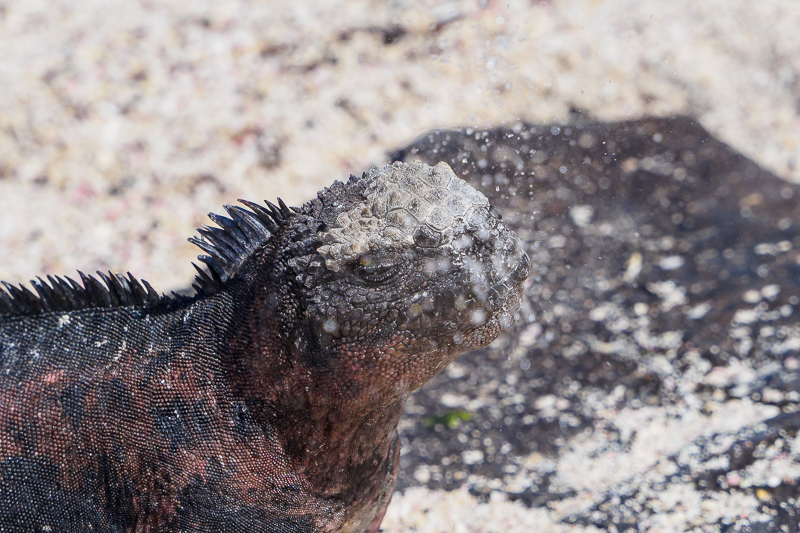
Amblyrhynchus cristatus venustissimus
Punta Suarez Isla Espanola
Galapagos Islands National Park
Olympus OM-D E-M1x
Olympus M. Zuiko 40-150 f/2.8 IS PRO
Pro Capture Mode – Handheld
1/2000 | f/8.0 | ISO 800
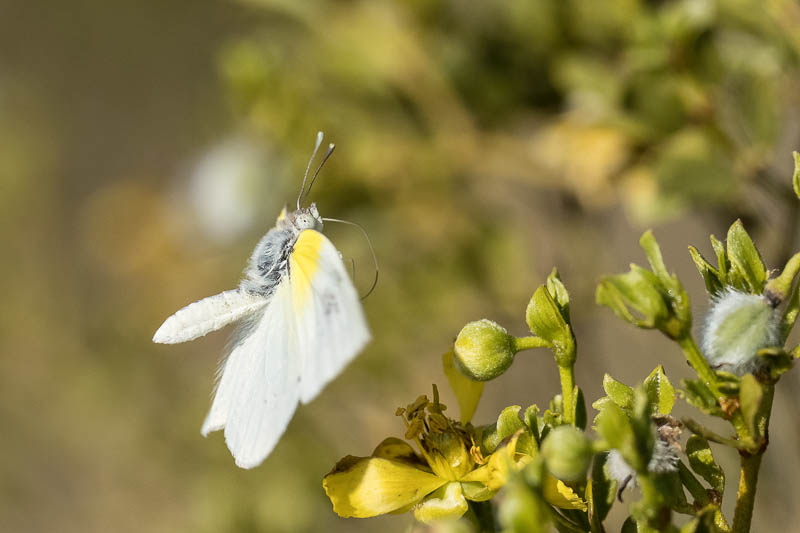
Kricogonia lyside
Olympus OM-D E-M1x
Olympus M. Zuiko Digital 300mm f/4.0 IS PRO + MC-14
1/3200 | f/7.1 | ISO 1250
